(strategys) |
|||
| Line 158: | Line 158: | ||
The only other way to get in the panic room is the Bonfire Sale power-up, negating the use of the DEFCON switches to get in. And also has a strategy where the 2 players with inferior weapons and points watch the barriers in the back and the others with Wonder Weapons watch the door. |
The only other way to get in the panic room is the Bonfire Sale power-up, negating the use of the DEFCON switches to get in. And also has a strategy where the 2 players with inferior weapons and points watch the barriers in the back and the others with Wonder Weapons watch the door. |
||
| + | ==Strategies== |
||
| − | ==[[Video:COD: Black Ops Kino Der Toten Zombies Round 30|thumb|300px|right|Kino der toten strategy]]Strategies== |
||
{{Main|"Five"/Strategies}}[[Video:COD: Black Ops Zombies- Five Round 29- Guide and Epicness|thumb|300px|right|Strategy for five with 2 people]] |
{{Main|"Five"/Strategies}}[[Video:COD: Black Ops Zombies- Five Round 29- Guide and Epicness|thumb|300px|right|Strategy for five with 2 people]] |
||
Revision as of 21:23, 2 February 2011
- "Do not pray for easy lives my friends, pray to be stronger men."
- — John F. Kennedy
- "The Pentagon is under attack! Washington is going to DEFCON 1 in this installment of "Zombies"."
- — "Five" description.
"Five" is the second of three zombie maps in Call of Duty: Black Ops. The map is unlocked after finishing the campaign on any difficulty, or typing "3ARC UNLOCK" on the computer via the main menu. This map is set in the Pentagon.
Characters
"Five" features four significant real-life figures from the Cold War era:
- John F. Kennedy - 35th President of the United States (1961–1963)
- Robert McNamara - U.S. Secretary of Defense. (1961–1968)
- Fidel Castro - Prime Minister of Cuba (1959–1976), President of Cuba (1976–2008)
- Richard Nixon - U.S. Presidential Candidate (1960), 37th President of the United States (1969–1974)
Transcript
Kennedy: For time and the world do not stand still. Change is the law of life. And those who look only to the past, or the present, are certain to miss the future. I said, are certain to miss the future!
Castro:(laughs)... Coño, I miss that!
(McNamara walks to Castro)
McNamara: Prime Minister Castro, this missile crisis was the last straw. We almost blew ourselves up. Now we invited you here today...
Kennedy: In good faith!
McNamara: ...in good faith, to sort this thing out.
Castro: And why is he here? (points to Nixon) He lost!
Kennedy: As I always say, forgive your enemies, but remember their names. Now gentlemen, as I like to think, in the long history of the world, that there are only a few generations...
(Nixon gets up out of paranoia)
Nixon: Sounds like someone breaking in...
Kennedy: Just the storm, Dick. Sit down.
(Zombies growl and break the window)
Nixon: Oh my God!
(Nixon faints, and Castro stands up from his chair)
McNamara: It appears the Pentagon has been breached.
Kennedy : (Calmly) Zombies. Gentlemen, in times like these our capacity to retaliate must be and has to be massive, to deter all forms of aggression.
(Kennedy activates the secret locker on the wall, revealing an arsenal of weapons)
Kennedy: Gentlemen, lock and load!
(Everyone loads up their guns)
Castro: Viva la Revolucion.
All of them stand together.
McNamara: Any last words, Mr. President?
Nixon: Yes Jack. Any superlative words of inspiration to your humble troops?
Kennedy: Do not pray for easy lives, my friends. Pray to be stronger men.
(Everyone cocks their guns, and the game starts)
Rooms
Boardroom
This room contains 4 windows and two sections of wall that can be broken down. It contains the Quick Revive machine and a telephone required for the musical easter egg. It also contains a teleporter (active only after the
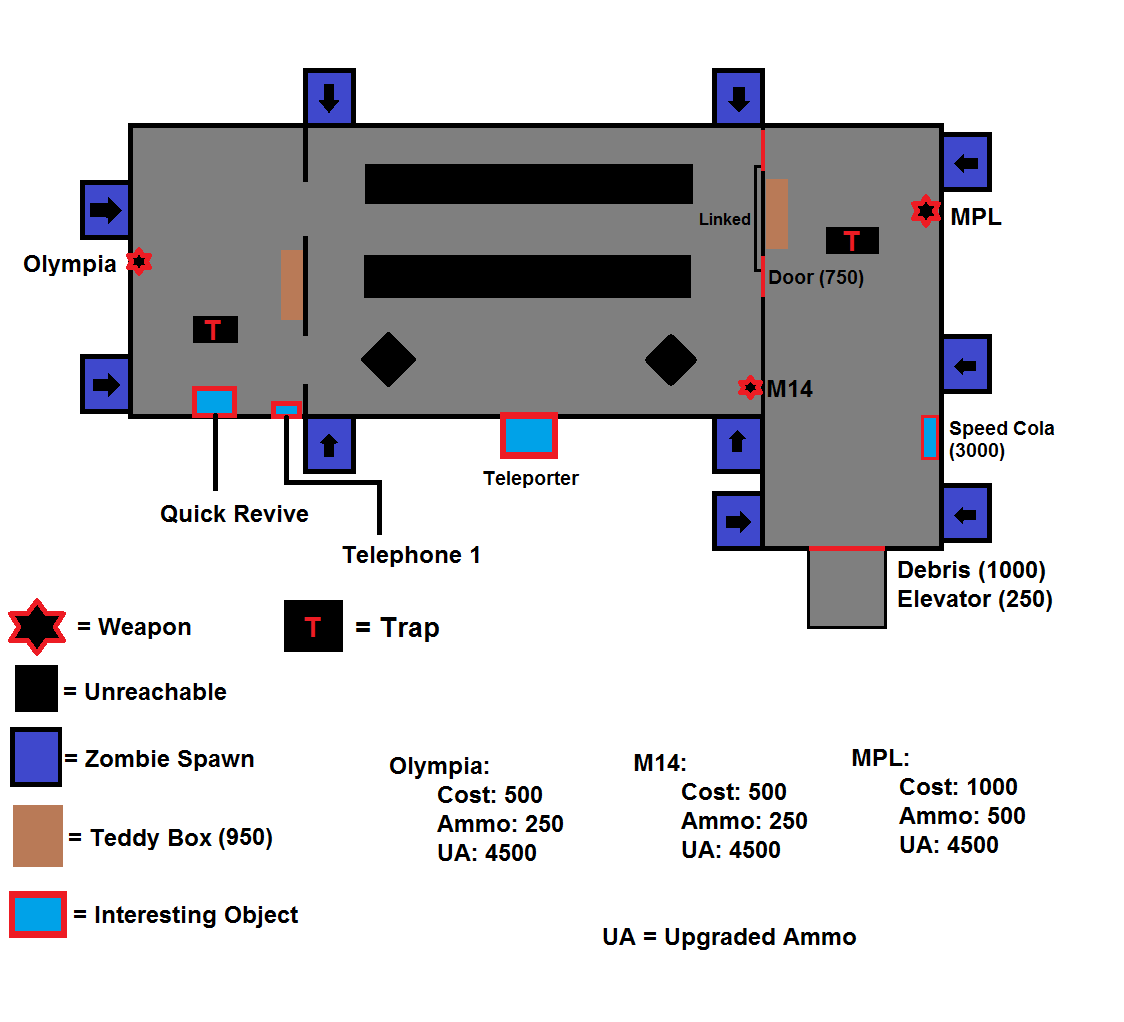
1st Floor
power has been turned on), the Olympia, and M14 available for purchase off the wall, both for 500 points. In solo the Quick Revive will disappear after three uses, effectively giving the player four "lives" as long as the player keeps returning to the machine. When the power is turned on, this room gets very dark, and the lights are either dimmed or flickering.
Hallway
This room is the only one that connects to the starting room. There are two doors that lead to this room; both will open when one is bought. It contains two windows and two sections of wall that can be broken down. It also contains the first elevator which takes the player down to the war room. This room also has Speed Cola, and an MPL available for purchase from the wall for 1000 points.
First Elevator
To access it, one must remove a barricade blocking it (costing 1000 points). Trips cost 250 points (both up and down). Zombies can get into the elevator to attack you and your teammates. There is little room to navigate in the elevator, so even a few zombies getting in can be devastating. With it being small when a zombie attacks it can trap you into a corner, glitch inside the Player, and kill the Player. The flames that appear are getting rid of the already killed zombies inside the elevator.
War Room
This room is the biggest actual room in the level, split into different sections. The first elevator takes the player to the top floor of the War Room which contains four windows, an MP5K and PM63 (1000 points each), and the Double Tap Root Beer machine. The player must then buy
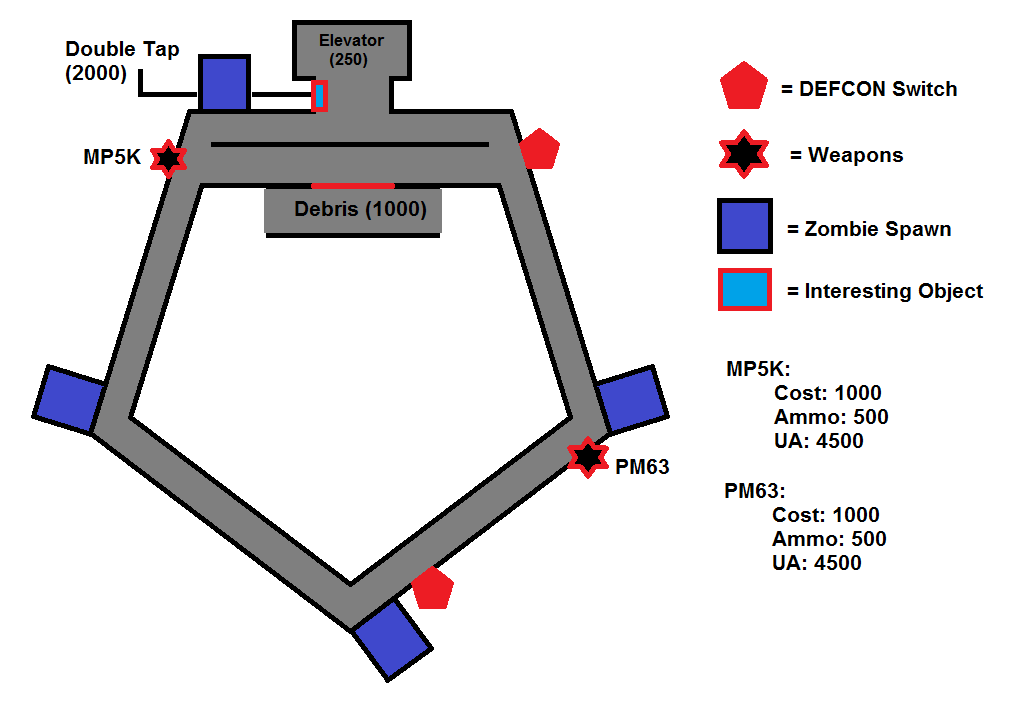
War Room - Top
access to the bottom floor of the war room for 1000 points. The bottom floor is divided by two barriers that must be bought for 1250 points each. It also contains the Juggernog machine, a Stakeout (1500 points), and the second elevator that takes the player down to the lab area. This room is connected to the bunker and contains the four switches that must be flipped to decrease the DEFCON level to DEFCON 5, which makes all teleporters go to the Pack-A-Punch room/Panic Room. It also contains a teleporter. It also
War Room - Down
contains the trap box that can be placed in your inventory and later used in the top floor metal detectors.The top level of the War Room
is the room where players are usually killed because occasionally someone will not guard a window, which will result in a break in. Smart players should have everyone take a window to stop this problem or (not recommended) elevator camp, just make sure everyone is in the elevator. Those in front can crouch and take care of the big mess while the two behind them and clean up and revive if necessary.
The bottom level of the war room can be taken care of easily if you stay together. Buy/Clear the two barriers and walk out of the zombies reach in a circle, all the zombies will bunch up in a horde making it easier and faster to kill them. It is recommended not to run while doing this as it ruins the cycle and the horde will divide.
Second Elevator
This elevator is much larger than the first and has a window on each level to make camping in the elevator more difficult. It also faces different ways depending on which level it's on. This elevator, like the first, cost 250 points to use between trips. Zombies can swarm players in this elevator easily as well. If several zombies become trapped in the elevator between floors it is possible to run around them in circles until the doors open again, assuming you have Juggernog.
Lab Area
This area is made up of hallways and rooms and is accessed by the elevator from the War Room. It contains the power switch and a telephone required for the musical easter egg. Once the Lab Area is accessed, gas zombies will spawn (only while a player is in the Lab Area), teleporters and Perk-a-Cola machines will be activated, the DEFCON level can be changed, and the path to the Bunker is available. The area itself contains several teleporters. The M16 and the AK-74u (1200 points each) can also be purchased in the Lab Area.
Testing Room
This room seems to have been a testing room as there is a live pig hanging from a crane which can be killed and some human corpses, very similar to the Nova 6 test subjects in "Rebirth" (Implying America got hold of Nova 6 and Reznov was correct that whoever got hold of Nova 6 would still use it). Claymores and a Mystery Box spawn are located here. It also contains two windows, and several doors. Also, one of the bodies in the room is confirmed as Sgt. Roebuck from Call of Duty: World at War, possibly saying he ended his life as a test subject.
Weapons Testing Room
This room seems to be used for Testing, as there is an unusable Winter's Howl, Thundergun and a Death Machine. There is one Mystery Box spawn and the Bowie Knife is located in there. This room is closer to the Teleporters that return them to the same floor level of the Labs, albeit on the other side of the Labs. One of the trap pieces can be found in a locker in this room.
Conference Room/Panic Room/Pack-A-Punch Room
The 115 Clearance Room is attached to the War Room and can be accessed once the power is turned on and DEFCON switches are decreased to 5. It contains one of the telephones required for the musical easter egg and the Pack-a-Punch Machine. It also contains two windows and a teleporter. It is seen in the Level "U.S.D.D." when Mason talks to John F. Kennedy.
Weapons
M1911: Starting weapon. Relatively weak against zombies, it will eat through your ammo quickly.Good for getting points during the early rounds.
M14: 500 Points. Useful in early-mid rounds because of high power and accuracy. Although sometimes it can be a bit of a problem at close range due to the fact that it's semi-automatic with a small magazine. Powerful at long ranges, and medium range if aiming at the head.
Olympia: 500 points.Useful weapon for the first few rounds. In the early rounds it will mow through zombies quickly. The need to frequently reload, especially if surrounded, is a huge disadvantage. Powerful at close range for the first few rounds. In the later rounds, It could take more than a whole pack of reserve ammo to kill a zombie.
MPL: 1000 Points. A useful weapon in early-mid rounds. High fire rate and low damage per bullet can lead to the player racking up a mass of points. However, it is still capable of chopping down the zombies. Its relatively small magazine and high fire rate leads to the player's ammo reserve being chewed through quickly.
MP5K: 1000 Points. Very useful in early-mid rounds. It features high damage per bullet, a moderate fire rate, and relatively large magazine. It is capable of mowing zombies down. However, as rounds progress the MP5K will become weaker, taking a whole magazine to kill a couple of zombies, meaning ammo will be depleted quickly.
PM63: 1000 Points. A useful weapon in early-mid rounds. It too features low damage per bullet and a high rate of fire, meaning points are easily racked up. It's mere 20 round magazine and extremely high fire rate can be problematic, and constant reloading can possibly prove fatal. Not as effective as the MP5K, but a fairly capable weapon.
Stakeout: 1500 Points. An extremely useful weapon in middle rounds. It's high power will make 1 shot kills very easy during middle rounds, making it a valuable weapon for guarding windows. It's major flaw is it's very long reload, which can prove fatal more often than not. A slow drop in power occurs as the mid rounds progress, until it takes 2 shots to kill in later rounds.
M16: 1200 Points. A weapon of questionable use in middle rounds. Although powerful and accurate at long/mid range, it's 3 round burst fire rate will make this weapon a very poor choice for close range encounters, making it very easy for a player to get swarmed while using this.
AK-74u: 1200 Points. A relatively useful weapon in middle rounds. It does not particularly excel at long ranges, but proves it's worth as a very mobile weapon with high power, making it useful for run and gun strategies. This gun can also hold its own at mid range.
Bowie Knife: 3000 Points. A pricey, but useful investment. It does not take up any weapon slots, and is a one-hit kill up to round 10-14(10 being most common, and 14 being very rare). Using this can rack up a mass amount of points, but is not recommended for use against a horde of zombies, as one can find himself easily swarmed.
However, if you get a ballistic knife with the bowie knife, you get up to double knifing speed and more damage than the bowie knife on its own. The upgraded bowie/ballistic knife will be a one-knife kill to about round 17.
Frag Grenades: 250 Points. A relatively useful investment. Although not useful as a main weapon, it useful as it can make crawlers reliably, buying time to allow purchasing weapons/ammo, reviving downed players, buying perks, etc.
Claymores: 1000 Points. A worthy investment. Useful for camping strategies as an extra defense. Always refilled at the beginning of each round. One must be careful as to not accidentally lure a crawler intentionally made into a placed claymore, should any remain.
Mystery Box Weapons - 950 Points. Chance of a Random Weapon, including 3 Wonder Weapons, the Ray Gun, Monkey Bomb, and Winter's Howl. Also risk of the Teddy Bear which will move the box to a random spawn point location (Locations noted by a set of 3 boxes with a Teddy Bear on top). Points are refunded if the Teddy Bear is received.
Electro-Shock Defenses - 1000 points There are two traps for the level Five on the first floor. In the first floor of the map (where you start off) there are two metal detectors turned traps that cannot be used even with the power on. This being because you need to find the missing part to each trap. One is on the second floor close to the shaft elevator leading to the lab, another in a room in the labs that is the closest to the shaft elevator. It is located in a locker. A player can hold up to one part of a trap at a time. The power needs to be turned on and the parts need to be retrieved and placed before use.
Thief Round
In "Five", a thief round will occur some time after round 6, as long as the power has been turned on. After the first appearance, the thief round will occur from then on every 4-8 rounds. Like the Hellhounds, this is a special round with no regular zombies. Unlike the Hellhounds, the Thief cannot down the player. The thief will chase after the player, and upon catching them, will take the gun the player has equipped. This can be excruciating in later rounds, especially if the player has a high-powered and/or pack-a-punched gun equipped. The thief will run around through the teleporters, until reaching the teleporter which brings the player to the starting room, upon which the thief vanishes. The player can kill the thief, or fail and see their gun disappear. He is also not attracted to monkey bombs. Aim for the head if you trust your marksmanship. Killing the thief after he steals a weapon will result in all weapons returned, Max Ammo, and a Fire Sale. Killing him before he steals anyones weapons will result in a Max Ammo, and a Bonfire Sale, which is like a Fire Sale but it also links all teleporters to the Pack-a-Punch room and drops the price to 1000 points. Not killing the thief will only result in a max ammo. He will only appear after the power is turned on. It is best to find which player the thief is chasing so that player can run around on the middle floor. Other players that are not targeted can shoot him down without being at risk of any weapons being taken. The Thief will appear as a cloud of red numbers to each player until they are targeted by him. Once a player has been targeted, he will be visible to that player until he either escapes or dies.
For the guide to get the trophy/achievement, see "Hands Off the Merchandise".
DEFCON
Another major gameplay element of this map is the DEFCON (Defense Readiness Condition) feature. In the main room of the Pentagon, there are a series of switches that will decrease the Pentagon's DEFCON level. After hitting four switches, and putting the Pentagon at DEFCON 5, a secret "panic room" will open up. This room contains the Pack-a-Punch machine. The Pack-a-Punch room will close once everyone has left the "panic room". To open it again, the DEFCON must be lowered to five again. The room will remain open as long as one player is in the room but when the doors are open the Pack-a-Punch Machine disappears. The DEFCON system is one of the only ways to access the Pack-a-Punch on this map. When DEFCON is lowered, ALL teleporters will go directly to the Pack-a-Punch room. Don't all go in through the teleporter at once or the player(s) will be downed.
The only other way to get in the panic room is the Bonfire Sale power-up, negating the use of the DEFCON switches to get in. And also has a strategy where the 2 players with inferior weapons and points watch the barriers in the back and the others with Wonder Weapons watch the door.
Strategies
- Main article: "Five"/Strategiesthumb|300px|right|Strategy for five with 2 people
Trivia
- One of John F. Kennedy's quotes is "Ich bin ein Berliner!" Taken from his speech in Berlin in 1963, meaning "I am a citizen of Berlin". One could also translate it as "I am a Berlliner" (a Berlliner is a type of jelly-filled dessert).
- If a player is downed on one floor, and his/her teammate(s) take an elevator up/down, they can see the zombies in the level that they are downed in disappear into a ball of electricity, presumably respawning in the level that the rest of the team is in, or they float up in the air.
- Usually players tap their foot in impatience while waiting inside for the elevator to open again. This can be seen when playing with 2 or more players.
- Sometimes when playing solo before you turn on the power, the two TVs on the first floor will show the Free Mason symbol, the pyramid with an eye on top. This may reference that the Free Masons may be involved with the zombie project. However, it is more likely that this is a relation to the Illuminati, who are affiliated with Edward Richtofen and Group 935 and use the same symbol.
- If the player watches the opening cutscene carefully they can see the cutscene is set in the Pack-a-Punch room. Even when Kennedy hits the wall the armory that appears is where the Pack-a-Punch machine is, how they got to the top floor is a mystery as the power is too low to use the teleporters. It is possible the power went down after they teleported into the starting room, however.
- In the cutscene the characters discuss the Cuban Missile Crisis.
- The name refers to both the DEFCON levels (of which there are five) and the sides of the Pentagon.
- Coincidentally, this map also marks the appearance of the fifth Wonder Weapon, the Winter's Howl.
- This map, like Kino der Toten and Der Riese, includes a Teleporter. Unlike Der Riese, however, the player does not need to pay for trips through the teleporters, and the player can walk right into them. Zombies can also go through teleporters, unharmed. If two or more players travel through a teleporter at the same time, they will come out of the next teleporter downed.
- The opening quote "our capacity to retaliate must be, and has to be massive, to deter all forms of aggression" by Kennedy was originally from John Foster Dulles, the United States Secretary of State under President Eisenhower, where the actual quote was "our capacity to retaliate must be, and is massive, to deter all forms of aggression".
- This is the first zombie map to take place in the United States.
- If the player tries to enter the panic room before going through the DEFCON levels, the player will be denied access and the text: "115 Clearance Required" will appear at the bottom of the screen. This is reference to Ununpentium, also known as Element 115.
- In the hallway, there are several pictures referencing Call of Duty: World at War, such as a plaque mentioning the battle of Peleliu, and Sgt. Roebuck at the Battle of Peleliu.
- Kino der Toten and "Five" both have roaming mystery boxes meaning they will always be in a different spot every time the game starts. The box has appeared in the starting room on rare occasions.
- It is the first map where players can destroy a barrier by breaking windows.
- "Five" is the first map since Zombie Verruckt which is entirely indoors, as well as the first map to feature all zombie spawns indoors.
- During the opening cutscene, on the wall of weapons there is a Ray Gun to the right of the Bowie Knife.
- The reason the player needs to lower the DEFCON level to open the panic room is because the room would be locked down when the DEFCON level is increased.
- If you go near a DEFCON switch while having the power on, the text will read "Press (X/F/Square) to lower death-con level."
- There are clocks on the wall where you spawn. They show New York, Hong Kong, Hanoi, and Moscow's time. The time shown is correct.
- Although the upper and middle floors largely resemble the level U.S.D.D., the lower labs are based on the lab areas on Rebirth Island.
- On the wall next to the MPL is a picture of Major John Plaster, who provided work for Call of Duty: Black Ops.
- There are three red telephones on this map: One at the start at the game, close to Quick Revive, one on a desk in the same room as the power switch, and the final phone is located in the Panic Room. Once all telephones are activated, "Won't Back Down" by Eminem will start to play.
- There is a television above each Mystery Box location which can be used to locate the Mystery Box.
- The portrait of Richtofen and the blank portrait from Kino der Toten appear in the Panic Room, possibly Sam Maxis informing her new victims of the men responsible for the zombie outbreak in the Pentagon.
- There are news boards with news connected to the zombies.
- This is the only Nazi Zombie map that has glass over windows. Once the glass is broken, it is replaced by wooden boards. A common tactic is to break all the glass and replace it with the boards, so it is easier to see incoming zombies.
- The loading screens for the zombie maps usually have quotes, one of them for Five says, "Manhattan DOWN!!!" This may mean the zombies have invaded New York as well, or may be a reference to the nuclear bombs dropped on Hiroshima and Nagasaki, which was called the "Manhattan Project".
- There is a unobtainable Death Machine on top of a shelf in a room on the lowest level.
- Five, just like Kino der Toten, will randomly choose a player's character when playing solo. However, when playing with multiple players, the color of the player's score counter indicates the character they are playing as. If their score is colored white, then they are playing as John F. Kennedy, if it is blue, they are playing as Robert McNamara, if it is yellow, they are playing as Richard Nixon, and if it is green, they are playing as Fidel Castro.
- John F. Kennedy, in one of his quotes from 'Five', references the 'Warren Report', the federal inquest that identifies Oswald as the lone assassin in Kennedy's assassination in Dallas, Texas.
- One of Nixon's quotes, "No, Mr. Hippie, I expect you to die," is a reference to Goldfinger, a film that came out during the course of the game. The line in the movie was, "No, Mr. Bond, I expect you to die!"
- One of the quotes when having killed a gas zombies is "And I thought they smelled bad on the outside!" This is a reference to Star Wars: The Empire Strikes Back, when Han Solo cuts utters the same line while cutting open a Tauntaun.
- In a room on the lowest floor there is a Winter's Howl on a table with work tools surrounding it. This strongly implies that the Winter's Howl was manufactured at the Pentagon.
- The same pictures of a zombie and hellhound from Der Riese are located in a room. This is odd, as there are no hellhounds in "Five".
- "Five" is considered to be the most difficult zombie map yet, due to the map being mainly comprised of narrow spaces, much in a similar fashion to Verruckt.
- This marks the first time in the Call of Duty franchise that the President of the United States, as well as a Prime Minister and other political people, are playable characters.
- The characters will often refer to Assault Rifles as Machine Guns, with the exception of M14, which they refer to as a sniper rifle instead.
- It's possible to see the base frame of an older teleporter, like the ones from Der Riese or Kino, through a zombie window in the basement, to the left of the AK74u. It could provide evidence that the US copied the technology, as the teleporters here are different. There's also a Ray Gun on a desk to the right, which might suggest they are researching or copying the gun.
- In the hallway with the Olympia there is a metal detector that when you approach the monitor text will appear saying "Access Denied: Requires Operational Component". The component is located in the Weapons Testing Room, or the room in the labs with the bowie knife. Take the component (it's on the shelves right in front of the bowie knife) and head to the metal detector. It will then allow you to place it and it becomes a electric trap.
- In one of the mystery box spawn locations on the lowest level, Nova 6 canisters are seen. It looks like smaller versions of the Nova 6 containers in Project Nova. It has N6 on it.
- At the end of the intro video for Five, all four characters can be seen getting various weapons from an arsenal in the room there are in. But at the start of the actual game, all players only have an M1911. Also, the weapon wall in the cutscene disappears when the match starts. This weapons cache is, of course, for cinematic purposes only. This can be amusing because many new players expect to start off with the wide arsenal of weapons, only to end up with an M1911.
- The DEFCON countdown from 1 to 5 makes sense, since at 1 in real life, all doors would be secure and bar anyone from entering them. At 5, security would be lowered and people could enter any door. You're lowering the amount of security by pulling the switches to 5.
- The portrayal of the characters in-game is rather humorous and satirical, with Kennedy being the swift and decisive leader of the group, McNamara being the calculating "brains" of the group, Nixon being the paranoid, narcissistic, Hippie hater of the group, and Castro loathing Capitalism.
- No Gas Zombies will appear in a round if no-one visits the lab section.
- The clock showing Hanoi will always show the time set on your console, meaning it will show the time in the other countries as they would be.
- In the War Room, if one dives into the railing around the center near the teleporter from the second step of the stairs, one can climb up the rails and above the teleporter. This is useful in later rounds, especially if one has Pack-a-Punched Wonder Weapons, as the zombies will be unable to attack them and will circle the teleporter mindlessly, even the Pentagon Thief. The only drawback to this is that the player(s) will be unable to get more ammo safely, unless a teammate is on the floor, so that he/she can collect any Max Ammo drop. This has been patched in 1.04, however.
- In rare cases the Pack-a-Punch will close while the DEFCONs are still up and might take your gun. In unfortunate cases, this "glitch" can ruin a Bonfire Sale for some players.
- In the opening cut scene, it appears that all the clocks are set to 12:00 AM, but the ingame clocks feature the correct time. This is due to the opening scene being pre-rendered.
- Despite it currently not being officially available, some Wii players have accidentally stumbled across the map when trying to play Kino der Toten. They describe it as incomplete. It is rumored that you have to enter the "3arc Unlock" code.
- On one of the podiums in the starting room, there sits a scrap of paper that reads "Ignomo Jubilus", which is roughly translated into "Laughable Mistake". This could be a nod at the fact that zombies managed to penetrate Pentagon security.
- On the metal detectors/traps the player can see III ARC and the Treyarch logo
- In the "Five" cutscene, Kennedy is quoted saying, "It's just a storm, Dick." This is in reference to horror movies such as Evil Dead.
- Any activated DEFCON switches will be de-activated at the end of a bonfire sale.
- Even though the power needs to be turned on in the earlier levels, the lights are already working.
- It is strange how it says "Power Levels Critical. Major Systems Offline" as the power is out. But it could say that because only the main systems are offline and has reduced the need for power, and the voice could be a part of the back up system
- In the Pack a Punch Room there is a book titled Exposed. What you cannot see without noclip is that on the back is a picture of what appears to be a gorilla but zombified the text next to the picture reads "man sent the first primate into space, and it returned.... The gorilla is believed to be a Cosmic Silverback from the Dead Ops Arcade and also makes an appearance in Ascension (Click Here)
- On one of the big Screens behind you when you first spawn, there is a picture of Shi No Numa, implying that the U.S government had known about the meteor being there.
- The light used to locate the Mystery Box from Der Riese can be seen if the player noclip out of the map.
- The switches read Press (action button) to lower Death-Con level.
- If a player completely dies on splitscreen, the other player will points subtracted for letting them die.
- A somewhat odd glitch can occur on split screen. If a player completely dies, and a powerup lands where he was, the lower screen, while spectating, will show the powerup image (E.g Instakill.)
- On split screen, it is possible to hear quotes from your dead partner if you stand near enough to where they died.
- When you enter the room where the Olympia spawn is, you will see a Sgt. Roebuck poster hanging on a wall, it will always be the last poster.
- There was a glitch in the first room where by arranging the boards on a window in a certain way, the player could hop up to the top of the window, and then to the tables in the room. As a result, no zombies could reach the player when he was on top of the tables or the window, and they would all die after a while, allowing the player to get to limitlessly high rounds. This glitch has since been patched, except on the PC.
- There are blood splatters around the map in the shape of the Grim Reaper, easily distinguishable by a scythe and a hood.
- A glitch occurs where the player can still hear voices of teammates that have be downed and died.
- If the map starts after the last campaign-level, you will always play as JFK.
- Despite the power being off, the players can still use the elevator. However, the PA system does say "Power level: Critical. Major systems: Offline," so it is possible the elevator requires so little energy that it is possible to use it on critical power levels.
- The Musical Easter Egg (activated by pressing the use button on three red phones) is Won't Back Down by Eminem. These phones are found next to the Quick Revive Machine in the Boardroom, near the power switch in the Laboratory, and on a small table in the Panic Room/Pack-a-Punch Room.
- The probable date of this map is November 19, 1963. This is proven according to the SR-71 Blackbird flight record in the War Room.
- There are a few lines said by the characters that reference the Quentin Tarantino movie Pulp Fiction, in particular the line,"Zed's head's dead!" said by Richard Nixon after getting a headshot.
- In the same room with the Winter's Howl, there is a Death Machine on a shelf, and an M16 and Thundergun in the cabinet. They are clearly un-accessible.
Quotes
- Main article: Five/Quotes