
Abandon Ship is the easter egg achievement/trophy for the map Voyage of Despair, in which the characters of the Chaos Story must complete the trial set out by the Sentinel Artifact.
Step 1: The Sentinel Artifact is yours for the Taking
The players will need to go to the Poop Deck and activate the Sentinel Artifact. This will open the red door areas of the map. It will also open the Portals and reveal the Pack-a-Punch Pedestals at the Poop Deck, Turbine Room, Lower Grand Staircase, and Cargo Hold.
Step 2: For the Elements are Four and Must be Attuned
Now the players can activate the Pack-a-Punch pedestals (four total). The last Pedestal activated is where the Pack-a-Punch will spawn. Once all four pedestals have been activated, and the Pack-a-Punch appears, the players will hear a sound consisting of a "ding" and chorus. By the time it appears in the Turbine Room, depending on how fast the Easter Egg steps are completed, players will be able to Pack-a-Punch the Sentinel Artifact. During this time, players will want to have built the Ballistic Shield and acquired it. Also, be sure to have collected all three Kraken Distillation Kit parts, and build it at the Engine Room Workbench. The fourth part to the Distillation Kit will be a part from a Catalyst Zombie. After the player kills a Catalyst Zombie (Poison, Water, Electric, or Fire) with the Kraken, it will drop a body part that they can use to Elementally Upgrade their Kraken. The player will first need the Poison Zombie Heart for the Easter Egg.
Step 3: To Change the Agents of Change is to Change Everything
For this step, the players will need to locate 4 Chalk Symbols and their 4 corresponding Clocks.
(This lists all possible spawn locations of the Symbols / Clocks)
Notate the Symbols and what numbers the minute and hour hands are positioned, on the Clocks. One might want to notate which area the Symbols and Clocks are located, in case they need to go back and check the Symbols or numbers, in order to save time. These can be found in any order. The player does not need to notate the actual time on the Clocks, but if either the minute or hour hand is not exactly on a number, notate which number they are nearest. There will be 4 Symbols and Clocks total, out of 6 possible locations.
- Mail Rooms: Symbol - Beneath a metal stairway. Clock - Directly opposite of the stairs, on the wall, near a doorway (back right, if facing the stairway).
- Bridge: Symbol - On a desk. Clock - In the Bridge, on the wall in front of the Captain's Wheel.
- Upper Grand Staircase: Symbol - Above a doorway, opposite the decorative Clock (back right doorway, if facing the Clock). Clock - Upper Grand Staircase, at the top of the stairway.
- 1st Class Lounge (Zeus Perk Room): Symbol: Beneath a candle mount on a wall (right corner, if facing the fireplace with the Clock). Clock - first Class Lounge, on a mantelpiece, above a fireplace.
- Galley: Symbol - On a cabinet beneath a counter. Clock - Galley, on a wall, about the 10 o'clock position from the cabinet with the Symbol, if facing the Symbol.
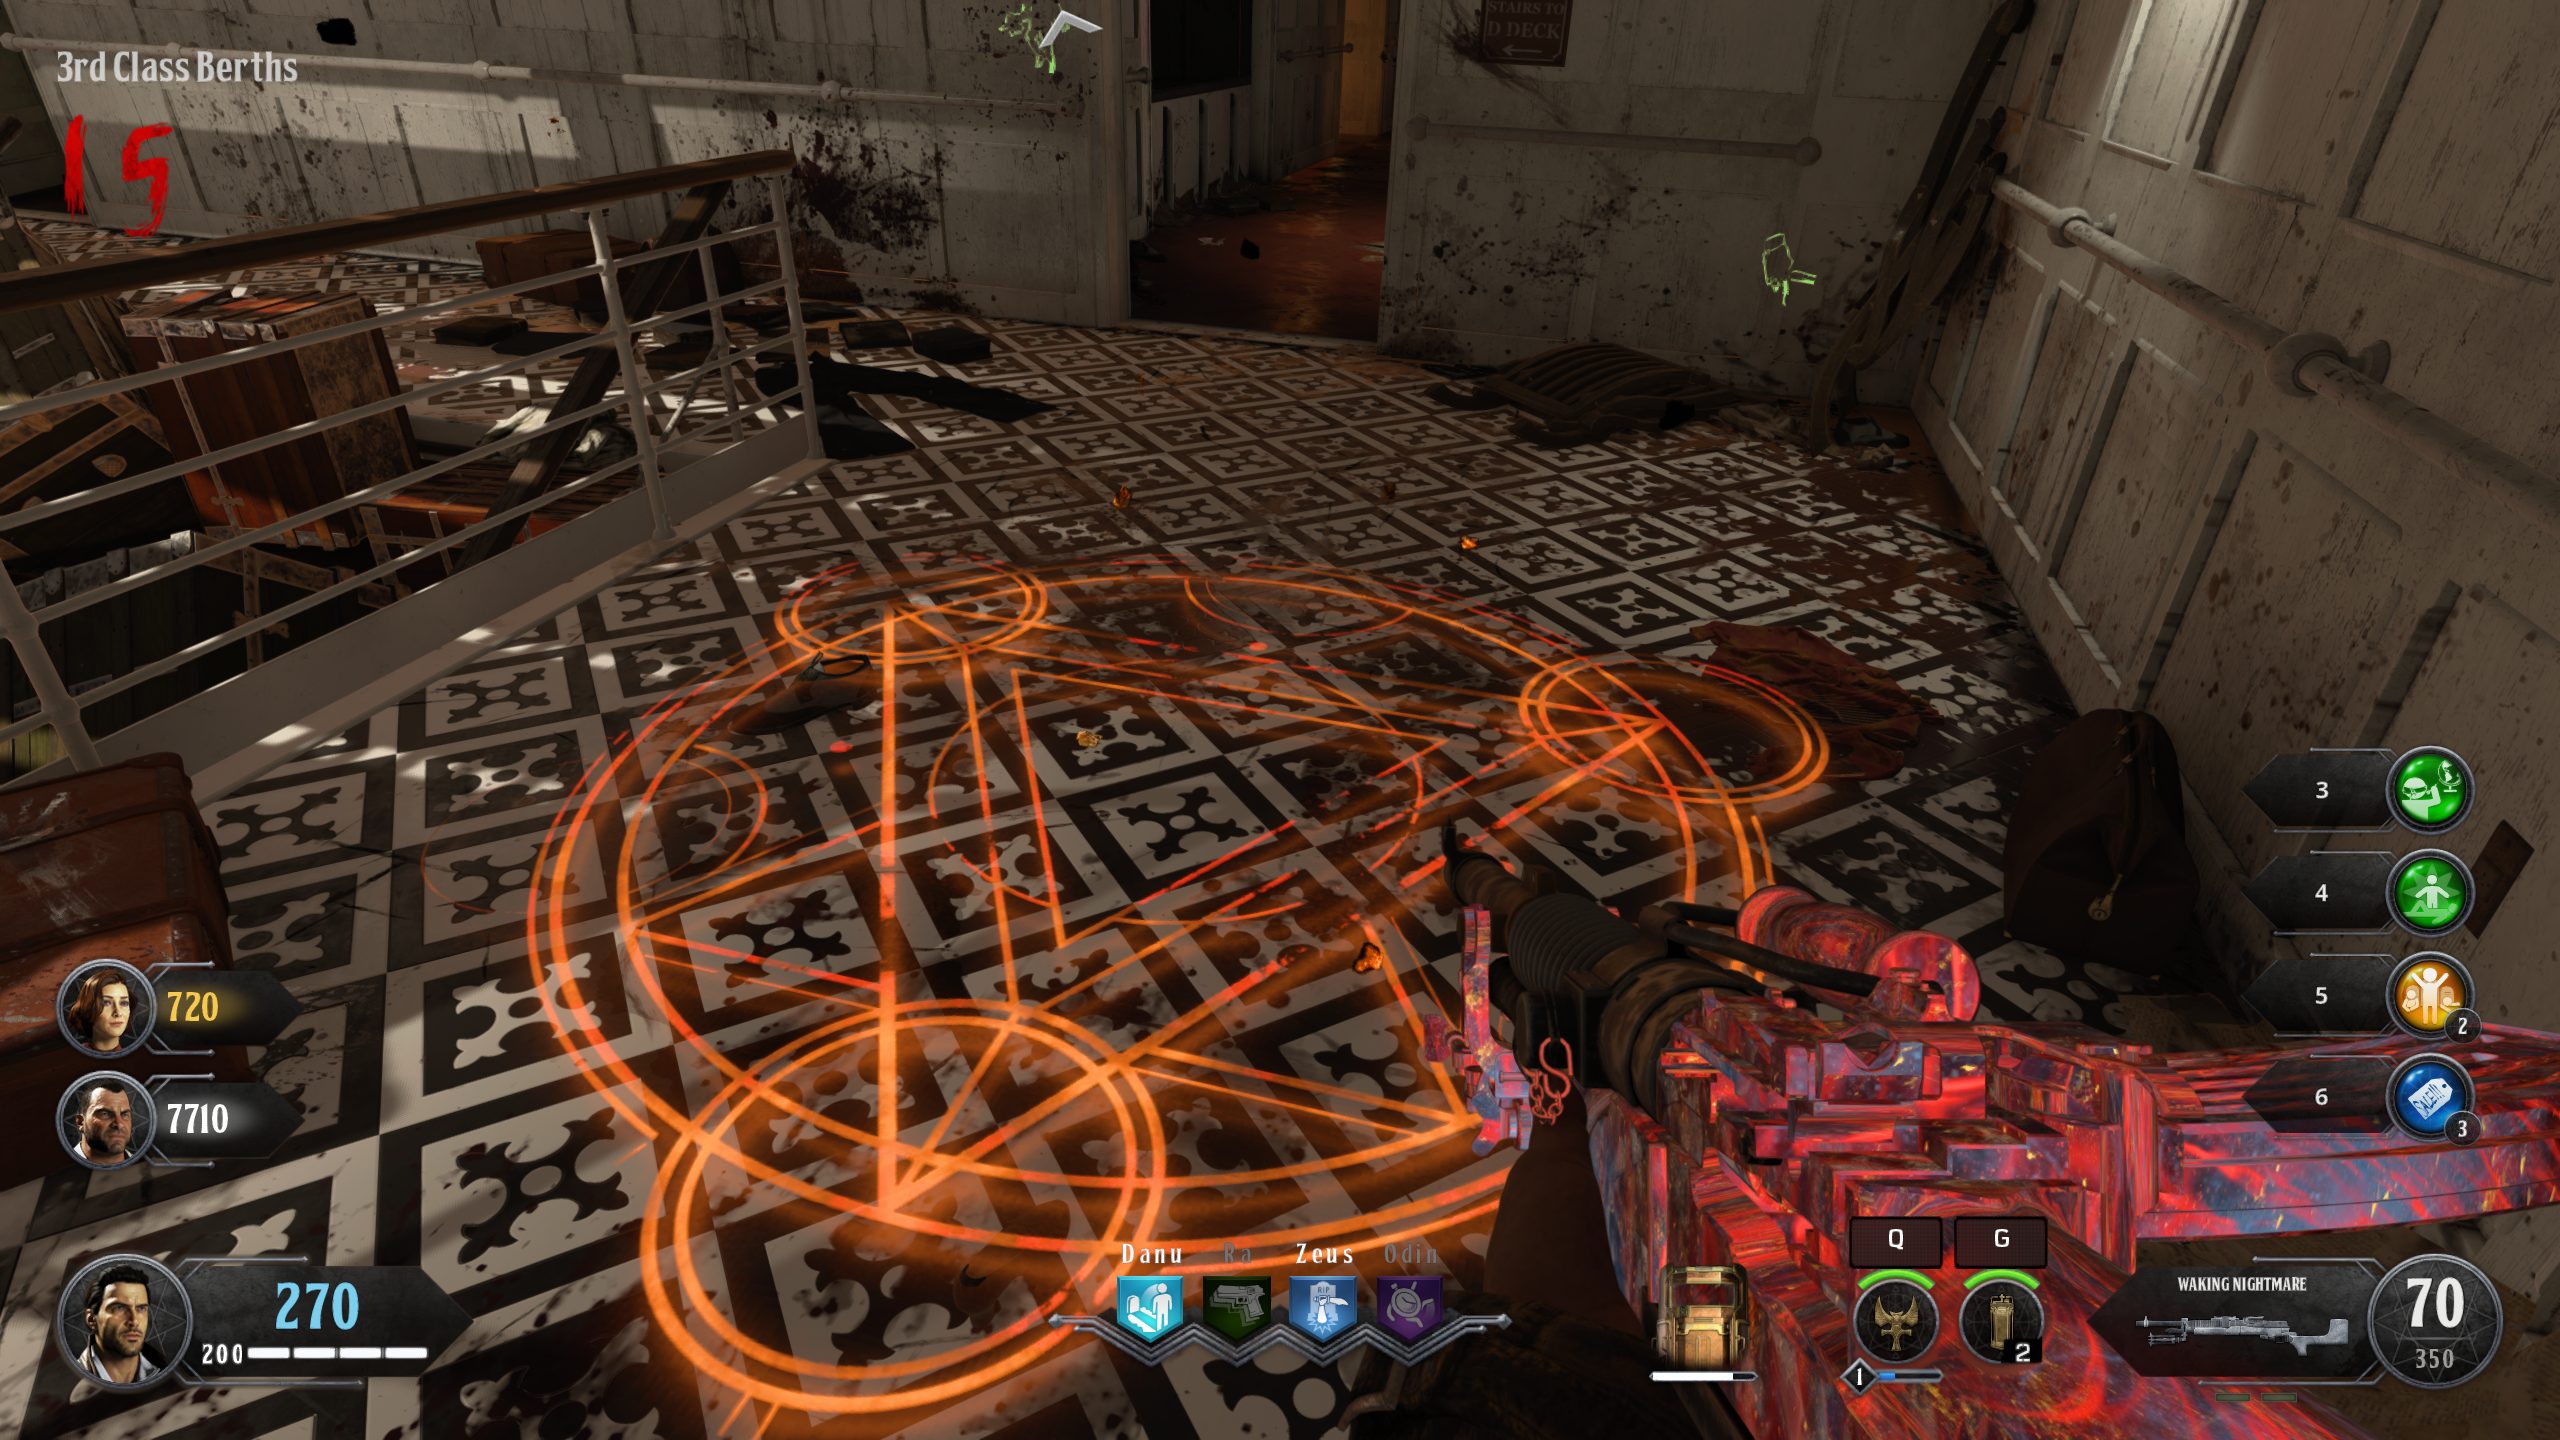
- 3rd Class Berths: Symbol - At the base of the wooden staircase. Clock - third Class Berths, on wall opposite the wooden staircase, where the Symbol can be located.
After the players have located the four Symbols and their corresponding Clocks, return to the Bridge where the four Levers are located. The Levers will have 1 Symbol each, on them. The Symbols consist of the following: Right side up triangle, upside down triangle, up dash triangle, and down dash triangle.
")
")
")
")
There are four Bridge Levers in all. Each Lever will have one of the four Symbols on them. The players will need to move them to the "minutes" position. Example: If one of the Clocks showed 2:50 as the time, move the Lever two spaces to the left. Think of the Lever as a clock. On a clock, the number 10 signifies 50 in minutes. The top of the Lever would be 12. Just aim at the Lever and then press the "Use" button to move the Lever. Aim toward the right side of the Lever to move it right, and aim toward the left side of the Lever to move it left. Note: There is a small clock hand, on the Levers at the Bridge, that stands for the "hour hand".
After the players is done placing the Bridge Levers in the correct minute positions that they found on the Clocks near the Symbols, they will need to go to the Poop Deck and do the same, except for the "hours" this time. There are 2 Levers by where the Sentinel Artifact was activated. If the player is facing the Levers, with the steering wheel in between them, the left Lever is for the Up Dash Triangle and the right Lever is for the Down Dash Triangle. Note: The Poop Deck and Engine Room Levers are for the Clock hour hand numbers. Place both Poop Deck Levers on the correct hour positions and then go to the Engine Room and do the same for those two Levers. The Poop Deck and Engine Room Lever Symbols do not appear on the Levers. Note: Engine Room Levers are "Up Triangle" for the bottom left Lever and "Down Triangle" for the top right Lever, if one is facing the Levers and the Odin Perk Statue is up the stairs behind them. There are four Levers total, in the Engine Room, but only two of them work. Once all eight of the Levers are in the correct positions, the player will hear a sound consisting of a "ding" and chorus.
Step 4: Within the Chain of Phases all is Conceived
The players will need to find 4 Electrical Outlets that will be sparking or leaking the four different elemental substances pPoison, water, electric, and fire).
")
")
")
")
")
The following locations are where the Outlets can be found:
- State Rooms: First accessible room on the far left, if coming from the Forecastle. The Outlet is located on a wall near a doorway.
- Upper Grand Staircase: On the top floor, on the right wall, if facing the Clock.
- 1st Class Lounge: To the left of the Zeus Perk Statue, if facing the Statue. Outlet is on a wooden beam.
- Dining Hall: Left of the Ra Perk Statue, on a wall by a table and chair. Face the Statue area to see the outlet.
- Aft Decks: Within a buildable barrier window, opposite the Mystery Box spawn location.
- 3rd Class Berths: Outlet is located by the staircase. Black and white design floor tile is on this floor of the ship.
After the players locate the Outlets with Elemental substances, bring the corresponding Catalyst Zombie to the Outlet and kill it close to the Outlet. Example: If the Poison Outlet is at the Upper Grand Staircase, lure a Poison Zombie to the Outlet, and then kill it. This will create a Symbol on the floor. The Symbol will act as a teleporter pad. Only one Catalyst Zombie can be killed near an Outlet per round. Example: Electric Zombie for round 9, Water Zombie for round 10, etc. After all four teleporter Symbols have been created, they need to be activated in a specific order. Correct order: Poison, Water, Electric, and Fire. Teleporter Symbols can be created in any order but MUST be used in the correct order. If the player performs the challenges out of order, they will waste time and ammunition.

Teleporter Symbol that appears near an Outlet after the correct Catalyst Zombie has been killed near it.
Note: To teleport, all players need to stand on the Teleporter Symbols. The pad will light up after everyone is on it. Hold the activate/use button and it will teleport everyone to a specific location on the map. Complete each challenge by killing Zombies, Catalyst Zombies, Stokers, and Blightfathers. Fairly often, a challenge will be completed after the last Stoker or Blightfather has been defeated.
POISON CHALLENGE: The players will be at the Poop Deck for this Challenge. First they will see a White Sentinel Artifact float up in midair. There will also be a Max Ammo Powerup at the very front of the Poop Deck. It is suggested to save this until the players have completed the Challenge. The Max Ammo will not disappear throughout the Challenge. During this time, the players will face Zombies, Poison Zombies and Blightfathers. Utilize the Ballistic Shield firemode, and or the Hellion Salvo, against the Blightfathers to take them down faster. Once the players have successfully completed the Poison Challenge, they will see a flash of white light and the White Sentinel Artifact will float back down near the Pack-a-Punch spawn location. Press the use button to acquire the White Sentinel Artifact. Rinse and Repeat for the next three challenges. Note: If a player does not re-acquire the Sentinel Artifact, they will not be able to teleport to the next Challenge. Also, after these Challenges, the players will return to the "normal" Voyage of Despair world. So, if the player left two Zombies alive before teleporting to the Poison Challenge, the zombies will return after completion of the Challenge. It is suggested to keep them alive and attempt to complete all 4 Challenges to save time.
WATER CHALLENGE: The players will be in the Cargo Hold for this Challenge. The Cargo Hold will fill up with water. The White Sentinel Artifact will float up into the air. There will be no Max Ammo for this Challenge. Have Special Weapons and high powered weapons ready. It is recommended that the player have a Pack-a-Punched weapon, and Homunculus, for this Challenge. During this time, the players will face Zombies, Water Zombies and Blightfathers. After the Challenge has been successfully completed, the players will see a flash of white light across their screen. The players are now in the "normal" world. The White Sentinel Artifact will float back down into the water. Grab the White Sentinel Artifact and hurry out of the Cargo Hold before the Zombies return.
ELECTRIC CHALLENGE: The players will be on the Boat Deck for this Challenge. There will be a Max Ammo floating near the center area. It's suggested to save it for after completing the Challenge. During this time, the players will face Zombies, Electric Zombies and Blightfathers. After the Challenge has been successfully completed, the players will see a flash of white light across their screen. The players have once again returned to the "normal" world. The White Sentinel Artifact will float back down, where a player can reach it. Grab the White Sentinel Artifact and head over to the final Elemental Challenge.
FIRE CHALLENGE: The players will be in the Boiler Room for this Challenge. The White Sentinel Artifact will float up into the air, out of reach, again. During this time, the players will face Zombies, Fire Zombies and Stokers. Be sure to have Special Weapons ready and take out all of the Stokers as quickly as possible. Hold up on the catwalk and watch the stairways on each side. After the 4th and final challenge have been completed, the players will see a flash of white light across their screen. The players are back in the "normal" world again. Now grab the Gold Sentinel Artifact that has floated down, beneath the catwalk, where one originally spawned. Get out of the Boiler Room as fast as possible, before the Zombies return.
Step 5: Before the Flame your Hubris is Devoured
The players need to have the kraken elementally upgraded to decayed kraken by this point of the easter egg. one or two players should have pack-a-punched (non-elemental upgraded) krakens for when they fight the boss, but this is just a recommendation. however, a player will need the kraken elementally upgraded to decayed kraken. The players should be at about round 20 by this time, if not, then hopefully an earlier round or so. Make sure to build the Kraken Distillation Kit at the table in the Engine Room, if not already done so. The player will need the Concentrated Decay Upgrade for their Kraken. They need to kill a Poison Zombie with the Kraken, which will cause it to drop a poison heart. Pick up the poison heart by walking over to the poison heart and pressing the "Use" button. Go to the Distillation Kit Workbench and upgrade the Kraken for 3000 points (If it is Pack-a-Punched, it will cost 6000 points). After the player upgrades the Elemental Kraken to Decay, use it to shoot the blue pipes in the Turbine Room. There are 9 pipes total. They will have steam coming out of them. After the player shoots them, they should turn to water leaks, if done correctly. The player will also hear a "metal noise" after they have been shot correctly. After all the blue pipes have been shot correctly, the Turbine Room will fill with water. Make sure the Pack-a-Punch is in the Turbine Room, as well. Now Pack-a-Punch the Sentinel Artifact. Just swim to the Pack-a-Punch and it will give you the option to Pack-a-Punch the Sentinel Artifact. Be sure to retrieve the Pack-a-Punched Sentinel Artifact and then drain the water if one choose to do so.
Step 6: When the Planets are Revealed the Essence is Received
Now there will be 9 Symbols around the map the player will need to activate. When activating these Symbols, the player will hear the Celestial Voice say the name of the Element relating to the Symbol they activated. These do not need to be activated in any particular order but the player should start at the Engine Room, and work their way to the Cargo Hold, due to their next step taking place there.
Locations of the Symbols are as follows with their corresponding Elements and Planets:
- Engine Room (Iron/Mars) - Take the stairs going up to the right of the Odin Perk Statue (if facing the Statue), and then take a left and a left onto a catwalk. Crouch or go prone to see it beneath a pipe. The player will need to go prone in order to reach the Symbol.
- Engine Room (Tin/Jupiter) - On the floor, in front of the Odin Perk Statue.
- Aft Decks (Neptunium/Neptune) - On the ground, in the middle of a life preserver, near the lifeboat
- Lower Grand Staircase (Silver/Moon) - On a wall next to a seat and open window in a corner.
- Millionaire Suites (Copper/Venus) - Beneath a table.
- State Rooms (Uranium/Uranus) - In a room with sinks, behind a plant.
- Bridge (Lead/Saturn) - On a wooden cabinet.
- Mail Rooms (Mercury/Mercury) - On the wall by the metal stairway, left of the Clock if facing the Clock.
- Forecastle (Gold/Sun) - On a metal vent at the back of the ship.
Step 7
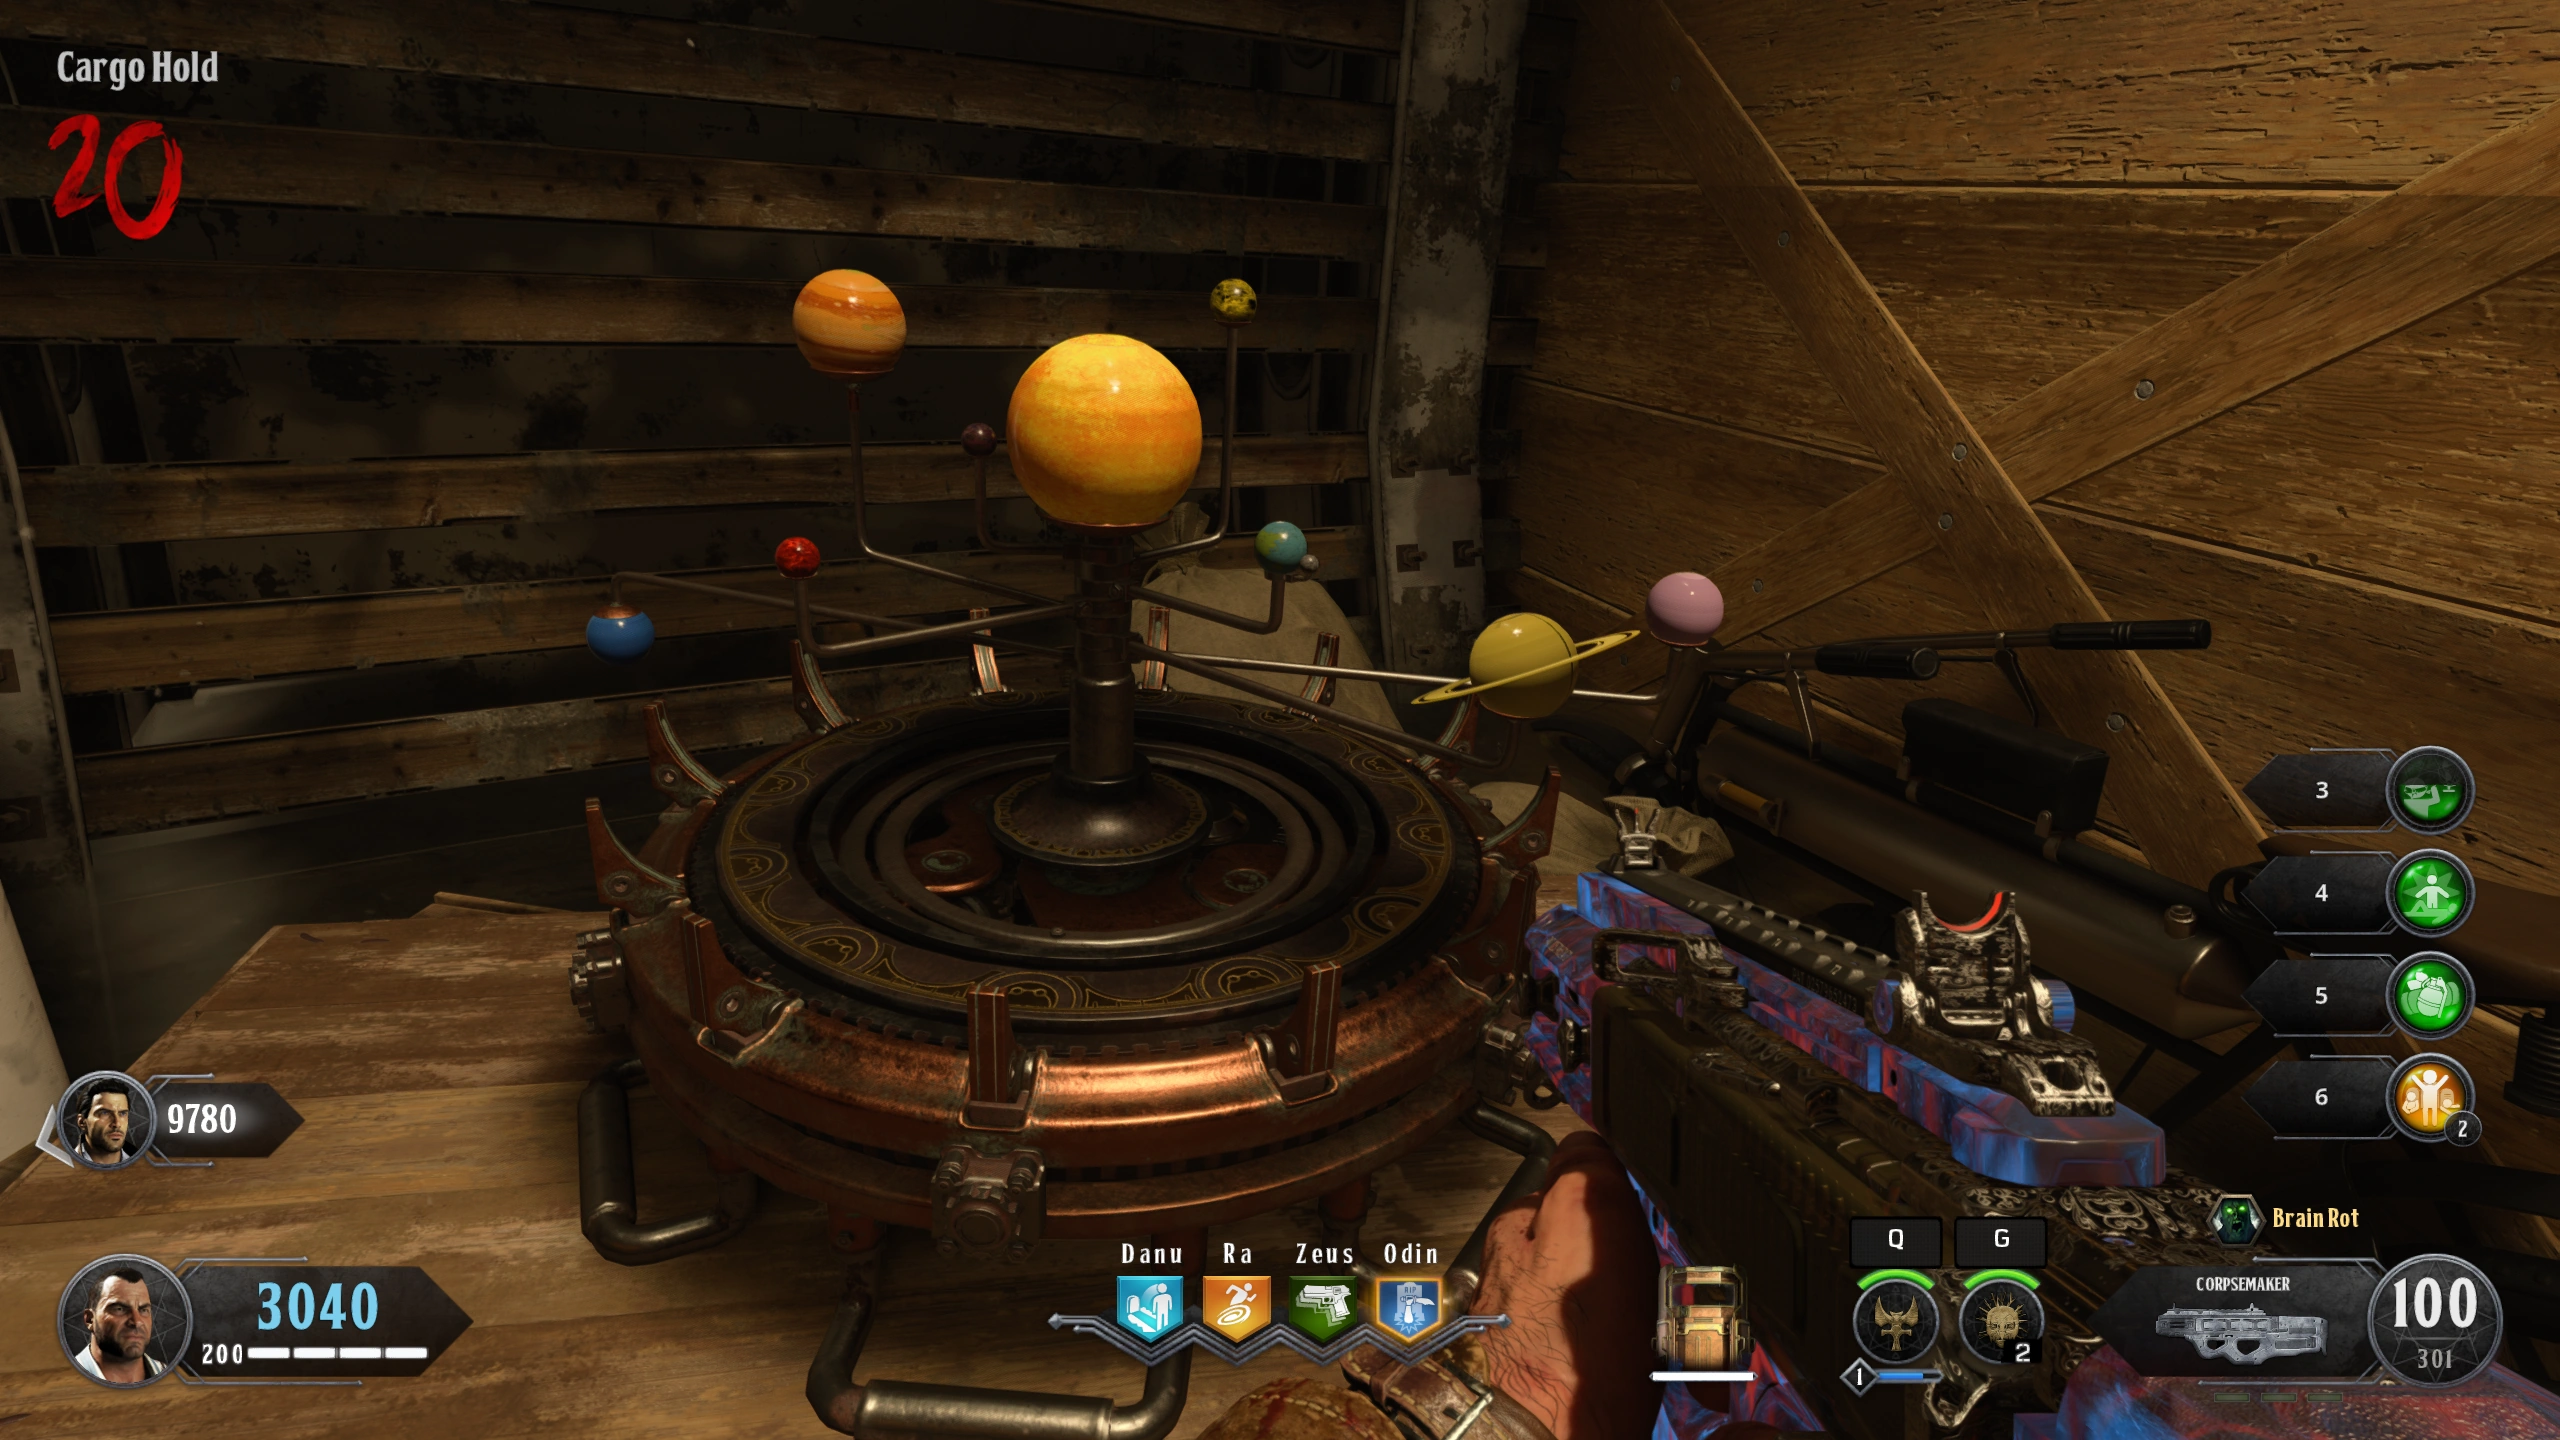
Go to the Cargo Hold, which might be filled with water, depending on if the player has drained it lately. If it is full of water, go to the wheel near the Pack-a-Punch spawn location, and activate it to drain the water. Go to the opposite side, where the Portal is located. If facing the Portal, there will be a medium size crate on the player's left, next to the large crate with the car inside it (this is the Skeleton Car for the Svalinn Guard Shield Easter Egg). As the water drains, the crate will burst open, revealing a model of the Solar System.
The model of the Solar System that appears from a crate in the Cargo Hold.
Go over to the model and press the use button on it. The player will need to be ready to record the Planets as they light up. The order they light up is random. The player can either write them down quickly or use their phone or a recording device to either call out the Planets or video record the order in which they light up. Once the player activates the Solar System model, it will begin to spawn enemies. The players will not receive points for any kills during this step, so they will want to work fast. Have another player lay down covering fire while recording the order that the planets light up. Use a Homunculus if necessary. Then quickly exit the Cargo Hold by either going upstairs to the Forecastle or by using the Portal.
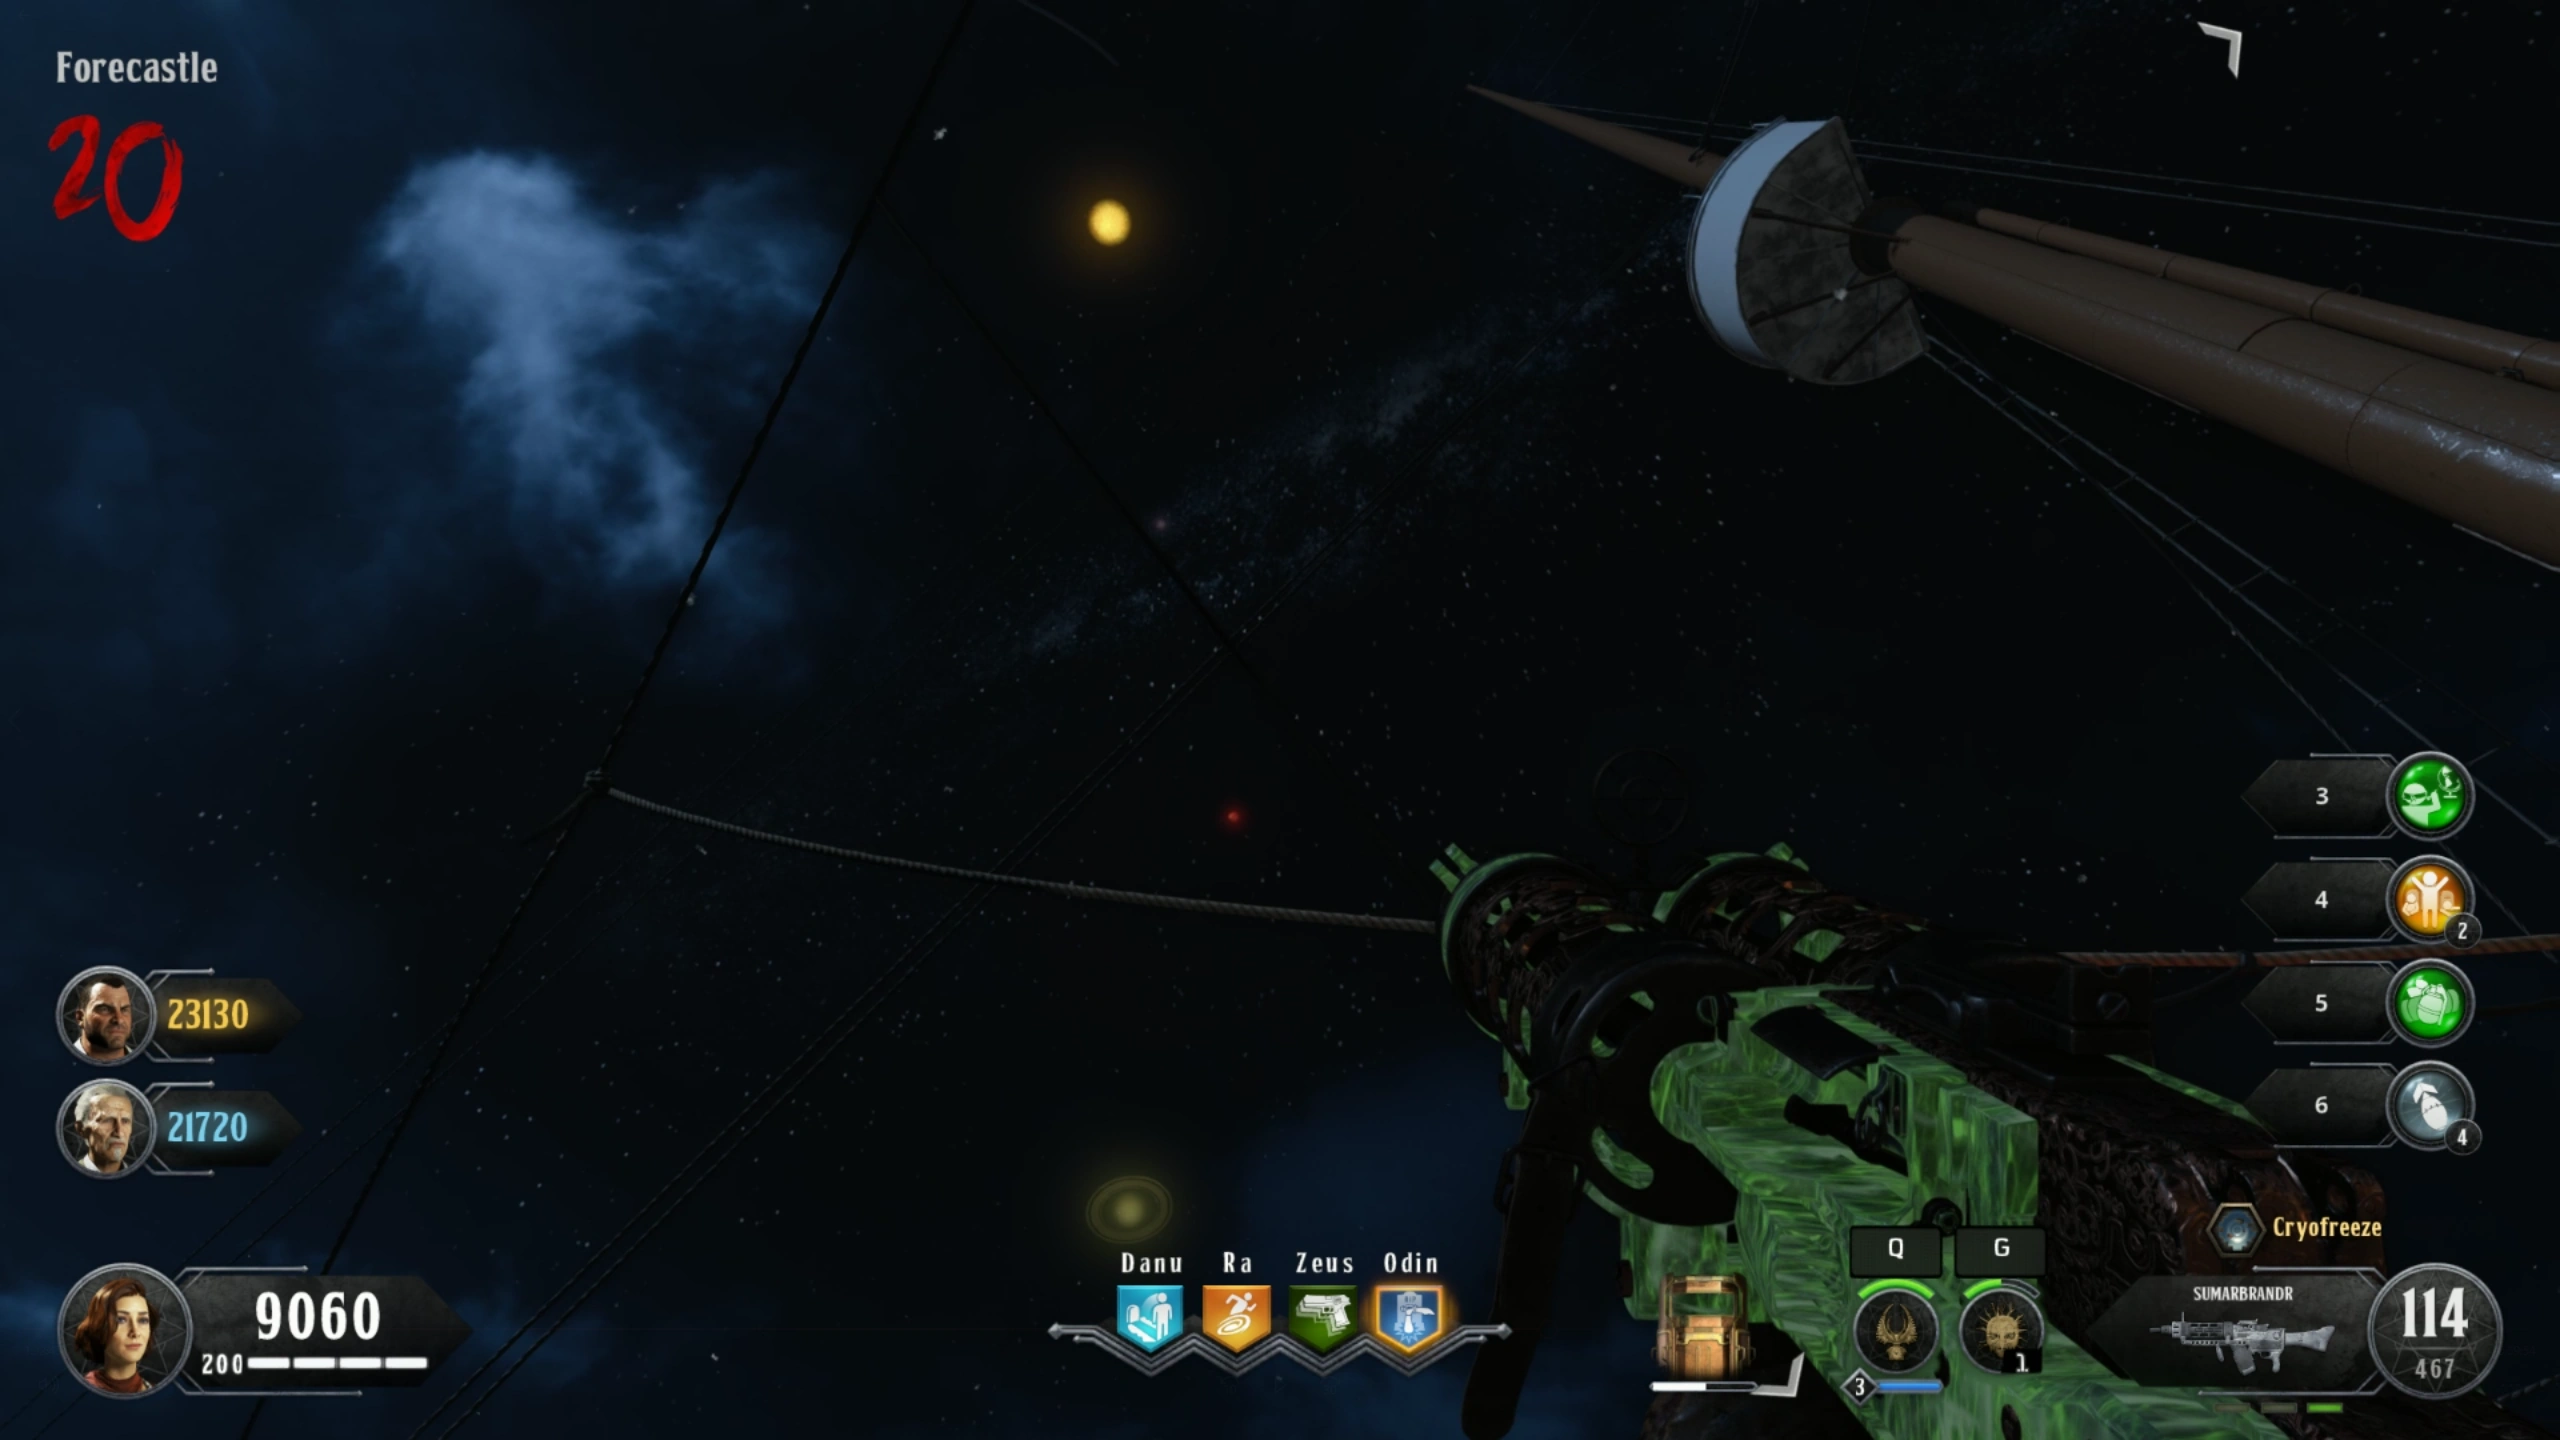
The Planets are in the sky if you look straight up. Remember that Pluto is considered a dwarf planet, and is not in the game.
The player can use either a normal weapon or a Pack-a-Punched weapon to shoot the Planets in the sky. Neptune however, will be in the water, floating along the horizon around the Titanic. Shoot the Planets in the order that they lit up on the model. When the player shoots a Planet, it will turn into a glowing blue orb and crash into the Symbol areas the players found earlier. Activate the orbs when one finds them. When the player shoots a planet, Zombies spawn and begin to run towards the player and the orbs, to destroy them. Time this correctly when shooting the planet. Get to the orb ASAP. One has approximately 30 seconds to grab each orb. Be sure to communicate with other players to get this step done successfully. If one shoots the wrong Planet, they will be able to re-activate the Solar System model by the next round. When the player get to the Sun, the entire team needs to activate it together. They will be teleported to a time trial sequence.
Step 8: Unto the Nest its Malice Unravels
Be fast on this challenge. Using the Krakens, and the beam of light from the Scepter of Ra, melt the ice blocks around the map. The players should melt their way to the Poop Deck. Communicate with other players and use one Scepter of Ra at a time. Rotate between players with the Scepter of Ra, and don't forget to throw a Homuculus to keep the enemies occupied. After the players melt the last ice block at the end of the Poop Deck, they will see a flash of white light across their screen, indicating the step is finished. If the players were successful, a Teleporter Symbol will appear on the ground, by the flag where the last ice block was located. The players can relax now. the icy screen will clear up. do not teleport yet!
Step 9: Behold the Eye of Malice and Despair
This is the final step and it consists of five boss fight stages. Meet the Eye of Malice and Despair, or as Diego calls it, the Sky-Eye.
It is recommended that one or two players have Pack-a-Punched (Non-Elemental) Krakens. This will help you and your team hold off the Zombies, Stokers, and even the Blightfathers. Be sure one or two players also have the Hellion Salvo Pack-a-Punched. This will help destroy the Stokers, Blightfathers, and the Sky-Eye. Also, make sure you and your team have Ballistic Shields (Svallin Guard if you upgraded the Shield), and repair them if needed. Get all of your Perks and try the Box for the Homunculus. Hopefully your special weapons (Scepter of Ra) are all Level 3. you will not return after the boss fight! get everything you can. try the mystery box before leaving to chance getting that kraken or homunculus!
There are 5 stages during the Boss fight. note: on the 5th stage, the boss has a team / squad wipe mechanic! use caution! this attack can take down your entire team!
You and your team need to all stand on the Teleporter Symbol and hold the "Use" button simultaneously. You will be teleported inside of the Iceberg! Swim to the center, where it looks like a tree or a root, and you and your team need to hold the "Use" button simultaneously at the center; to place the Sentinel Artifact into the Iceberg. You will now be teleported back to the Titanic.
Phase 1: Poop Deck
After you meet the Sky-Eye, be sure to not waste ammunition on the Boss, as it will do no damage to it. Instead, you will need to focus firepower on Zombies, Elemental Zombies, Stokers, and Blightfathers. As soon as you are on the Poop Deck, a Max Ammo and a Carpenter will be at the very back of the ship. Save them to replenish your weapons and repair your Shields. They will not disappear. It is best to wait until the end of the stage (which will notify you by a flash of white light across your screen) and then grab both Power Ups. If you, or a teammate's Shield, is about to be destroyed, let everyone know and decide whether to grab the Carpenter Power Up or not. Just remember, if you or your teammate's Shields are destroyed, you will not be able to get a new Shield. Communication with your team, especially during the Boss fight, is extremely crucial. You may want to move around the area to avoid getting cornered. Watch your corners, do your best to not get trapped by the objects on the ship, and have you and your team either run clockwise or counterclockwise. This will eliminate chances of you running past each other, and into the arms of each other's hungry Zombies. Continue fighting of the enemies until the flash of white light across your screen. Then grab the two Power Ups ASAP, because you will automatically be teleported to the next stage.
Phase 2: Engine Room
Once again, kill Zombies, Elementals, Stokers, and Blightfathers. Max Ammo and Carpenter Power Ups will be located on the lower level. Save them until the end, just like the first stage. Spread out of this stage. Maybe have two players on the lower level and two players on the upper level. Continue moving and keep your head on a swivel. The Zombies come from many areas and can trap and take you down if you're not paying attention. Utilize the Hellion Salvo on the Stokers and Blightfathers. Again, do not attempt to attack the Boss, as it is still invincible during this time. When you have finished off the last of the Stokers and Blightfathers, the white light should flash across the screen, and you will need to grab the Max Ammo and Carpenter Power Ups ASAP before you're teleported.
Phase 3: State Rooms
Zombies, Elementals, and Stokers for this stage. No Blightfathers (at least on the normal difficulty). The Boss is now vulnerable because it will attempt to attack you and your team. The Boss has an Eyeball Freeze Beam that fires from the eye. This can freeze you in place and you will not be able to move. However, it has been stated that it is possible to get out of being frozen in place by meleeing, but this has not been confirmed. The Boss will fire its Freeze Beam down both hallways of the State Rooms. It is best to run to the nearest connecting hallway, and stay in the middle. On each side of this connecting hallway is a Power Up. A Max Ammo on one side and a Carpenter on the other side. You can peak out around the corners and fire on the Boss when it fires its Freeze Beam down the halls. This stage is extremely dangerous, due to the tight quarters, and the many enemies that appear. Several Stokers will appear, so stay alert. Communicate with your team and have the players with Hellion Salvos fire on the Boss when it fires its Freeze Beam. During this time, you and the other players need to be protecting the Hellion Salvo players. Keeping the Zombies and Stokers off of them, as well as yourself, will help tremendously. Allow Hellion Salvo teammates to focus fire on the Boss while you protect them, so that they don't have to worry about being attacked or going down. If you feel you are about to go down, or a teammate is about to or has gone down, plant your Level 3 Scepter of Ra. This will heal you if you are hurt, but also revives you and downed teammates. If you or a teammate is down and outside of the Scepter of Ra bubble, crawl into it and it will revive you. Let your teammates know to do the same, in case they're unaware. Don't forget about the Homunculus! Utilize them often because not only do they distract the enemies, but you will receive more after you get the Max Ammo. When you hear the Boss growl, after it takes damage, you will know you are making progress. Hit the Boss as many times as possible with the Hellion Salvo, and eventually, the screen will flash white. Grab the Max Ammo and Carpenter Power Ups on each side of the hallway, near the front of the State Rooms, before you're teleported to the next stage.
Phase 4: Promenade Starboard Deck
You will be killing Zombies, Elementals, Stokers, and yes, Blightfathers again. A Max Ammo and Carpenter will be at the opposite side. Save them, just like the previous steps. Utilize the chunks of Iceberg by taking cover behind them when the Boss fires its Freeze Beam. Watch out for enemies! Don't let them make you jump out of cover when the Boss is firing, or you'll be frozen in place. Make sure the Hellion Salvos are being fired into the Boss every single time it fires its Freeze Beam. The Sky-Eye will become cracked and red, showing that it is damaged. The Boss will growl after about 3 to 4 Hellion rockets. Protect the teammates with the Hellion Salvos and use the same strategy as before. Don't forget to throw the Homunculus AWAY from you and your team. This way you all can concentrate firepower on the Boss. When the screen flashes white, run and grab the Max Ammo and Carpenter Power Ups before you are teleported to the final stage.
Phase 5: Poop Deck
Prepare to fight Zombies, Elementals, Stokers, and Blightfathers. A Max Ammo and Carpenter Power Up will be at the back of the Poop Deck, just like before. The Boss will teleport around the sides of the Poop Deck. Do not forget the boss will use its team wipe mechanic on this stage! be careful or it will cost you the game! Kill all enemies. Utilize the Scepter of Ra shield, when you plant it, and this will help you heal faster. Teammates with Hellion Salvos should be shooting the Boss when it fires the Freeze Beam out of its eye. Shoot into the iris and pupil area. You will need to fire about 4 Hellion Salvo rockets into it before you hear it growl. It will then teleport to another area. You will do this around 3 times. After the 3rd time, the Boss will let out a roar and you will have approximately 10 seconds to interrupt the team wipe. You will see the Boss, at the back of the Poop Deck, begin to shake rapidly. It is charging its team wipe shot. Immediately throw a Homunculus to get the enemies away from you and your team, and plant a Scepter of Ra for good measure. Stay inside the Scepter's bubble JUST IN CASE you go down from the Boss' team wipe. The bubble will automatically revive you. Be aware that sometimes the enemies do not follow the Homunculus, and will ignore it and attack you. Stay vigilant. If you are not within the Scepter's bubble, and you have the Dying Wish Perk fully charged, this will save you from the team wipe. However, this will only happen once, as Dying Wish takes a long time to charge and will not have charged enough in time before the Boss attempts to team wipe again. After you have interrupted the first team wipe attempt from the Boss, you will need to do this about 2 more times. Shoot 4 rockets into the Boss, 3 times each. The roar from the Boss (as well as one of the Chaos characters mentioning something about the eye charging) will let you know to throw a Homunculus. Plant the Scepter if you feel the need to do so, and be sure to focus all firepower into the Sky-Eye. After you have successfully defeated the Eye of Malice and Despair, you will see it whisk away into the air. Congratulations! You have defeated the Boss and the Achievement / Trophy is yours! Enjoy the ending cutscene!
")
")
")
")
")
")
Template:CoD15 Achievements