(→Trivia) |
1337 SPNKR (talk | contribs) (What about Soap and the Black Ops characters? Undo revision 1499805 by Ultimate94ninja (talk)) |
||
| Line 87: | Line 87: | ||
==Trivia== |
==Trivia== |
||
| − | *This is the first time in the Modern Warfare series that the playable character's model can be seen as the camera changes to his perspective from the UAV's in the beginning of the level. |
||
| ⚫ | |||
*The player can save the [[SAS]] commandos inside the truck before jumping out of the window; the [[RPG]] will still destroy the truck. To perform the above, simply don't jump out the window until everyone is at a safe distance from the truck and then jump. |
*The player can save the [[SAS]] commandos inside the truck before jumping out of the window; the [[RPG]] will still destroy the truck. To perform the above, simply don't jump out the window until everyone is at a safe distance from the truck and then jump. |
||
| ⚫ | |||
*The brick building in the background looks remarkably similar to buildings found in [[Storm]]. |
*The brick building in the background looks remarkably similar to buildings found in [[Storm]]. |
||
*The level's name "Mind the Gap" is a reference to an audio message and warning sign in most London Underground Stations that tells passengers to "mind the gap" between the train and the platform edge. |
*The level's name "Mind the Gap" is a reference to an audio message and warning sign in most London Underground Stations that tells passengers to "mind the gap" between the train and the platform edge. |
||
Revision as of 18:20, 1 June 2012
- "C'mon mate! Let's give these bastards a proper British welcome!"
- — Sgt. Wallcroft upon entering Westminster Station
"Mind the Gap" is the seventh mission of Call of Duty: Modern Warfare 3. The player takes control of Marcus Burns, an SAS Commando in London.
Characters
- Marcus Burns (playable)
- Griffen (K.I.A.)
- Wallcroft
- Redgrave
- Meyers
- MacMillan (Baseplate) (voice only)
- MI5 Director (Cutscene only)
- SIS Chief (Cutscene only)
- MI6 Officer (Cutscene only)
Plot
At a warehouse in Canary Wharf, a group of terrorists load classified cargo into a fleet of moving vans. Unknown to them, a UAV circles the area, performing surveillance and several SAS teams begin to converge on the scene. Marcus Burns, one of the SAS Commandos, Wallcroft and Griffen jump a fence and sneak into the alleyways behind the warehouse. Along the way, the team catches a few of the terrorists off-guard. Marcus is then instructed to kill them without alerting any other hostiles.
After securing the warehouse, all pretence of stealth vanishes and Wallcroft orders the team to engage the terrorists directly. The team exits the warehouse and fights its way to a nearby dock. Vulture Two-Two arrives and assists the player at this point. Once the area is clear Wallcroft orders Burns to open the doors of a van, but they find nothing.
The surviving terrorists fall back to an underground tube tunnel, where they board and hijack a tube train. Wallcroft and Marcus chase after them through the tube on a pair of pickup trucks. During the pursuit the underground train derails, crushing one of the pickup trucks and flipping the trio's truck as they pass right underneath Westminster, killing Griffen.
Wallcroft walks from the flaming wreckage and checks on Marcus and finds him in good condition; the two of them inspect the underground train for survivors. As they reach the Westminster station platform, both come under heavy fire from the surviving terrorists, forcing them to fight their way up to the streets of London just a few feet from Westminster Palace itself.
Upon reaching street level and joining up with another SAS team, the two teams block a road where they open fire on another terrorist truck. The truck flips over, and it turns out to be a decoy. The camera then cuts to Davis Family Vacation, where an actual chemical agent is set off exactly in front of the child. After that, news of chemical attacks in other European cities and the Russian invasion of Europe are shown in the cutscene.
Video Walkthrough
Weapon Loadout
Starting Weaponry
Found In Level
The following weapons can be found with and without attachments.
Gallery
")
")
Intel
17. Enter the building across from the locked door, turn left, and look for the intel on a crate.
18. Before (or after) opening the truck doors, run to the building to the northeast. The player will find stairs leading up to a catwalk. Follow this path until the player can enter the building and check the desk for some intel.
19. As soon as the player gets to the top of the first escalator, look for a newsstand in front of the player. The intel is on the ground behind the counter.
Transcript
- Main article: Mind the Gap/Transcript
Trivia
- The player can save the SAS commandos inside the truck before jumping out of the window; the RPG will still destroy the truck. To perform the above, simply don't jump out the window until everyone is at a safe distance from the truck and then jump.
- The HAT on the UAV in the beginning of the level is at "1,337", a reference to 'leet' talk.
- The brick building in the background looks remarkably similar to buildings found in Storm.
- The level's name "Mind the Gap" is a reference to an audio message and warning sign in most London Underground Stations that tells passengers to "mind the gap" between the train and the platform edge.
- This mission has sparked controversy due to apparent similarities to the July 7th London terrorist attacks.[1]
- When looking at the skyscraper in the top right corner, one will see that is says Kriegler. The word Kreigler appears multiple times throughout Modern Warfare 2.
- The underground maps in the station contain many comedic place names and references such as "Jizz Jazz St.", "What is this St.", and "Kriegler Metropolitan" and "IW Central".
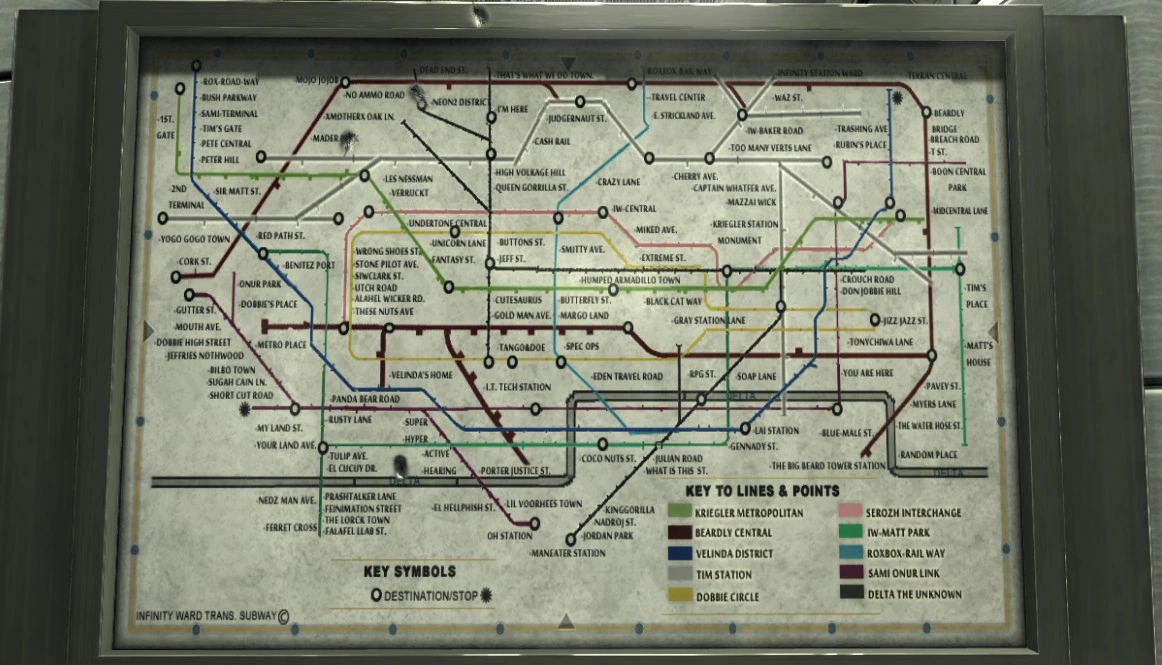

The map shown in the subway stations.
- There is a movie poster with the person from the Call of Duty: Black Ops map Convoy's wanted poster.
- The TIME magazine that is visible as a poster in the Tube station references not only the battle in New York City, but also labels Price and Soap as INTERPOL's most wanted in the top left corner, and notes that General Shepherd has been laid to rest in Arlington, Virginia. People who pre-ordered the game recieved a copy of this poster.
- When the player stops the truck, if they look through the windshield they will notice there isn't and never was a driver. This is probably done to save memory.
- It is possible to set off an M.O.A.B. in this level. At the end of the level, after the player stops the truck, run around to the windshield. Knife it (this may take several knifes to hit the right spot). If you hit the right spot, you will teleport inside the truck as the M.O.A.B. is set off. Everything will have a reddish tint afterwards, just as it would in multiplayer. [source needed]
- The MP5 the player uses is equipped with a Holographic Sight and a Suppressor, although the in game description says it is only equipped with a Holographic Sight.
- The player is allowed to kill one civilian in this level, accidentally or not. This also counts when the player gets back to street level at the end of the mission where the player can shoot a civilian in the crowd without penalty.
- The Jubilee Line strip can be seen on the Westminster platforms.
- When Sierra 1 kills the two enemies, the window they shoot through does not break.
- This is one of the few levels where assault rifles are not available.
- At the beginning of the mission, if the player zooms in to the truck that is loaded, the box that carry the chemical agents has the shape of an Ammunition Crate instead of a long crate with a "FREGATA" label shown in the cutscene.
- When the player gets back to street level at the end of the mission, one policeman can be killed without penalty.
- If the player exits the game after the train crash, and resumes it later, the loading screen will be Sgt. Burns waking up after the crash, as seen in-game, instead of the mission briefing. Furthermore, after this point, the menu will say there is only one intel instead of two, as before, suggesting this might have been planned as a different mission.
- At the very end of the level, it is possible to move most of the cars forward by throwing a grenade in the back of it.
- Towards the end of the mission, when friendly SAS soldiers are taking the terrorists prisoner, the terrorists can be shot and killed without penalty. The soldiers simply stand up and look on as if nothing happened, even if the prisoners were on the ground being restrained.
- The P90 has a different suppressed sound in campaign mode than in multiplayer. The AK-47 posessed by the player in "Back on the Grid" has the same effect, along with the SCAR-L in "Stronghold" and the PP90M1 in "Bag and Drag."
- Although some S.A.S. members holster a MP7 on their leg platform, it is never used nor found in the level.
- Right before the player jumps out the window, there is a P90 with multiple attachments that cannot be picked up.
- If the player decides to skip the Davis family vacation cutscene, the truck that is intercepted will explode and kill everyone except for Burns and Wallcroft.
- One can kill the officer wielding the SPAS-12 at the end of the level by shooting him as soon as he steps out of his vehicle.
- The steering wheels in the cars in this level are on the left, rather than on the right even though the mission takes place in the U.K.
References
| |||||||||||